Having an electric golf cart is cool. These not only allow you to run on wheels at a cheaper cost, but they also save the environment too. But maintaining its charge is crucial. What the hell it would be like, when you ride onto the cart with your golf bag, but your cart won’t run and shows NO CHARGE. What worse can it be when you remember charging it fully last night?
Then you are left to decide between the two – either your batteries have gone dead, or your chargers are not working.
Though the batteries are the culprits in most cases, you must know how to test a golf cart battery charger, too, for assurance. Let’s proceed to the details.
Quick Navigation
How Do You Know if You Have a Battery Problem or a Charger Problem?
Well, as it is mentioned before, mostly it’s the power-cell life running out that causes your problem. But it is easy to find too. If you suspect the batteries have a problem, connect them to another cart, they won’t work. The same applies in the case of chargers.
However, this trick is not possible to do out of workshops or where there is none else owning a golf cart. So, find out a common symptom: If the charger doesn’t start charging at all – the batteries have a problem. If the charger starts charging but doesn’t charge fully or stops after a while, they have issues.
If you have newly bought the golf cart, you may get confused if you do not know how many hours of power supply you may expect from your batteries. So, you must learn how long do batteries last at a single charge.
How Would You Be Sure If Your Golf Cart Battery Charger Is Bad And Needs to be replaced?
Before you test your golf cart charger, you must find out the battery conditions because they are mostly the ones causing problems. Follow the steps to find out :
Step 1: Check the Minimum Voltages of the Batteries
Well, whenever you face a situation that your golf cart doesn’t kick on, you must inquire when you have charged it last? Do you know what does a golf cart battery charger requires to turn itself on? Batteries charged weeks ago or bought completely new don’t have the minimum voltages inside the circuit to get your chargers to start the charging process.
Chargers require detecting voltage before they apply amperage to the circuit. Some models require 5 volts, whereas other models necessitate nearly 75% of the operating system’s voltage. So, 30 V and 40 V would be needed respectively for 36 volts and 48-volt carts. Generally, the least requirement goes between 20 and 40 Volts which kick-starts the automatic cart chargers available nowadays.
Additionally, you should make sure whether you can use deep cycle batteries on a golf cart.
How Do I Troubleshoot My Golf Cart Battery Charger if It Isn’t working even after Manual Charging?
Connect each of your batteries to a manual charger of 6 Volts to 12 Volts and charge them all together for 15 to 20 mins. This would help reach the minimum required charging level. Some modern chargers come up with Storage mode or Winter mode, which can prevent such run-outs if they are kept charging the batteries while not in use.
If you manually charged the batteries, but still it’s not charging, then what to do? Go to the next step.
Step 2: Check Battery Components
It is always crucial to take care of your battery health for your batteries to last longer and your charger to work properly. Check for frays, corrosion, or ruts in the terminals and wires of the system. The cables should be tightly attached to the negative and positive terminals. Find if there are loose connections among them. Any of these may disturb the charging process.
Also, you need to pull the caps off the output terminals. The liquid inside the cells shouldn’t have turned gray or brown – otherwise, this would call for replacement. To find out the best golf cart batteries for replacement.
Step 3: Check Your Battery Charger DC Side Connections
You may find the circuit intact with your external check-up and then keep wondering what the problem actually is. Then to check your batteries accurately, you need to find a Voltmeter – digital or manual. You may also charge the batteries fully before you attempt this procedure
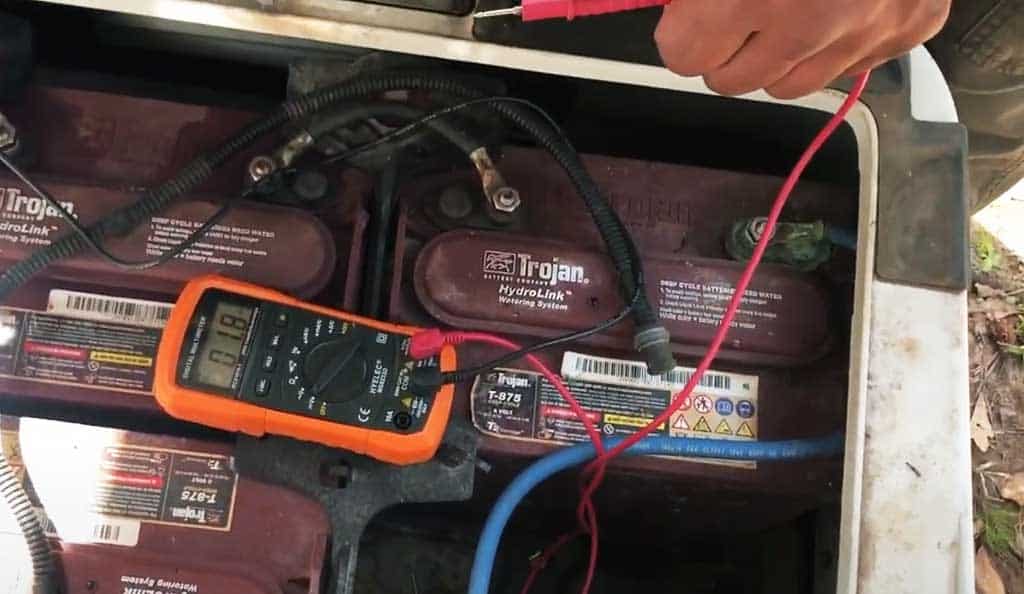
step 4: Connect the Battery Terminals to A Voltmeter
Checking the current voltage level will let you know if the batteries are fully or partially charged or dead. Below the front seat, chambers opening forward usually accommodate the batteries on most models of Yamaha, Club Cars, and Ezgo carts. Find the positive and negative ports and connect the voltmeter. Check the output voltage.
Fully charged 36 V systems show results between 37 V to 38 V, and 48 V systems show between 49 V to 51 V. If the Voltage shown is significantly (20%) lower than it is branded to be, the batteries need replacement.
Step 5: Connect the Charger Port to A Voltmeter
You will have to get a reading of the charging ports. Connect the voltmeter leads to any two of the three charging receptacles. Give it a couple of tries to find out a positive reading. If the voltage shown here is the same as the reading in the output ports, the battery has no problem. A slightly lower reading would mean a loose connection, and if no voltage is shown, then there would either be fuse wire or totally disrupted circuit.
How to Check a Golf Cart Battery Charger?
Now, as you are sure of your cart battery health, you are also sure that the chargers are the culprit. Then you must know how to test a cart charger that you have. Let’s follow the steps below to learn how to troubleshoot your charger as well.
Step 1: Turn the Battery Charge and Connect a Voltmeter
When connected to the clamps of the charger duly, the voltmeter would show the amount of amperage the charger sends to your power cells. The voltmeter needle will sit on the left to show no flow of amperage when the chargers are switched off and will swing to the right when the charging starts.
Step 2: Check and Clean the Circuitry
Check the wires and cables connected to the charger while turning the ignition to ‘Auxiliary.’ Not turning on the charger would indicate a defect in connection.
One of the crucial connections is the grounding wire coming from the charger. It attaches to the golf cart’s metal frame inside the engine housing in a single wire form. Frayed or damaged grounding wire would hamper charging.
Dirt may gather on your charger parts from continuous use over time. Any strains like grime or rust should be cleaned and removed duly to ensure proper charging.
Step 3: Feel Your Charger
Golf cart chargers convert AC current into DC to charge cart batteries through a transformer. The charger transformer makes a humming sound, by the way. The absence of this sound would signify the transformer not working properly.
You need to touch the charger and feel if overheating takes place. Overheating from corrosion and debris obviously causes a malfunction in charging.
Step 4: Look Out if the Charger Fuse is Blown
The back fender of the cart contains the service panel with a charger fuse on it. Check if over-voltage has blown it off.
The Last thing to know: How Many Amperes Should Your Charger Have?
Chargers with more amperage do their job quickly for sure. But it hampers cell life to a great extent. An ideal 36 V power cells should be charged with a 21 A charger, and a 48 V with a 13 A. However, more than average low amperage chargers don’t provide that much extra long cell life as compared to the hassle it causes through delayed charging.
Well, You have learned how to test a golf cart battery charger – Everything that You Must Know!